

The Brioche Dilemma
Why do so many homemade brioche buns collapse under the weight of a juicy burger, and how can you build one that actually holds up?
The answer arrives before you touch the flour. A bun destined to cradle a sauced, dripping patty is a different animal from the pillowy pastry brioche you'd tear apart at breakfast. It has to do two contradictory things at once: yield instantly to your bite, then stand firm against a flood of meat juices, melted cheese, and whatever aioli you've got dripping down your wrist. Tender and structural. Soft and stubborn.
Most home versions fail because they chase softness alone. They come out gorgeous, then dissolve into paste the moment a hot patty sweats into the crumb.
The classic gourmet joints — think of the standard set by a place like DuMont Burger, never treated the bun as an afterthought. They built it around a specific flour-to-fat logic, not a generic dinner-roll recipe scaled up. That's the shift in thinking this whole thing hinges on.
A quick word on scale before we go further. For a substantial 5-inch burger, you want each dough ball landing around 90 to 105 grams. For a thinner, diner-style patty, drop to 75 to 85 grams. The bun should match the burger, not the other way around.
Selecting the Right Flour and Hydration Level
Work backward from the failure mode and the flour choice makes itself. Flat buns that soak through almost always lack the gluten strength to trap gas and resist wet fillings. All-purpose flour simply doesn't have the horsepower here.
Reach for unbleached bread flour in the 12.5 to 13.5% protein range. That extra protein builds the strong gluten network that lets a bun rise tall instead of spreading wide and sad across the tray. If you've ever pulled a batch that looked more like a UFO than a bun, weak flour was probably the culprit. Practitioner accounts of burger recipes point the same direction — strength up front, or structure never arrives.
Hydration is the next lever, and it's a fussy one. Count both the whole milk and the water contribution from your eggs, and hold the total to 58 to 62% of flour weight. Push higher and the dough turns slack, hard to shape, prone to baking wide and low.
Why Whole Milk Earns Its Place
Water hydrates. Whole milk does more. Its lactose feeds deeper browning on the crust, and its milk fat softens the crumb without making it fragile. You get color and tenderness from one ingredient — a quiet efficiency worth respecting.
Mix until the dough clears the bowl in intermittent sheets and feels tacky rather than batter-like. In a stand mixer that's usually 6 to 9 minutes, and this is all before the butter goes anywhere near the bowl. For the deeper mechanics of how these proteins knit together, the science behind gluten development in enriched doughs is worth an afternoon.
One honest caveat specific to enriched dough: those ratios assume unbleached bread flour in that 12.5 to 13.5% protein band. Softer regional flour, or flour that's been sitting through a humid Brooklyn summer, absorbs differently. Hold back 15 to 25 grams of milk per 500 grams of flour until the dough texture confirms the formula. Trust your hands over the scale on that final splash.
Balancing Butter and Eggs for Structural Integrity
Here's where the burger bun parts ways with pastry brioche. Traditional French brioche can carry butter up to half its flour weight and glory in the richness. A burger bun that rich bakes into a crumb that shears and crumbles the instant a sauced patty leans on it. Cake, not architecture.
Keep butter at 18 to 22% of flour weight. Rich, yes. Structural, still.
Timing Is Everything
Butter is delayed on purpose. Add it before the gluten forms and the fat coats the flour proteins, smothering the network you're trying to build. So develop the gluten first, then work softened butter in over 3 to 5 additions, waiting 45 to 90 seconds between each so the dough re-tightens instead of smearing greasily around the bowl.
Watch for the classic failure: a dough that feels loose and slack after the butter goes in, one that won't hold a rounded shape. That dough bakes flat and wide, and it drinks burger juice like a sponge. If you feel it slipping, you added too fast.
The Egg Equation
Use 1 large egg plus 1 yolk per 500 grams of flour. The yolk brings fat and lecithin for emulsification — that's the richness and the silk. The white contributes water and protein that support lift and structure. Together they balance decadence against backbone.
Finish mixing after the butter for 5 to 8 minutes. Stop when the dough stretches into a thin, elastic membrane that tears slightly rather than pulling a flawless windowpane. Slight tearing is the target. This isn't sandwich bread; a little resistance means the crumb will hold.
Utilizing the Tangzhong Method for Lasting Softness
Burger buns live on a service window. You might bake in the morning, split them at dinner, griddle the cut sides, and still need them tasting fresh at 8 p.m. Tangzhong is the technique that buys you that time.
The idea is simple and a little magic. You pre-cook a small portion of the flour and liquid into a paste, gelatinizing the starches so they hold far more moisture than raw flour ever could. That trapped water is what keeps the crumb soft for days instead of hours.
Quick Tip: For 500 grams of total flour, cook 25 grams of it with 125 grams of whole milk, then subtract both amounts from your main dough formula. The roux is part of the recipe, not an addition to it.
Cook the roux over medium-low heat for 2 to 4 minutes, stirring constantly, until it thickens into a glossy paste and reaches roughly 149 to 154°F. Then let it cool below 100°F before it ever meets the yeast. Hot paste stuns or kills yeast, and a sluggish rise undoes all your careful gluten work.
The payoff is real: tangzhong buns hold a softer crumb for 2 to 3 days at room temperature, stored airtight, while straight enriched buns firm up noticeably by the next morning. For anyone baking ahead of a dinner crowd, that difference is the whole ballgame.
Proofing, Shaping, and the Double Egg Wash
Treat proofing and shaping as structure-building steps, not chores you rush through to get to the oven.
Bulk proof at 74 to 78°F for 75 to 105 minutes until the dough is visibly aerated. Or, for easier shaping and deeper flavor, give it a short room-temperature start and then refrigerate for 8 to 14 hours. Cold dough shapes like a dream.
Building Surface Tension
Divide into 90 to 105 gram pieces, pre-round each one, and let them rest uncovered for 8 to 12 minutes. Then final-shape by pinching the edges into the center and rolling the ball seam-side down on an un-floured patch of counter for 20 to 30 seconds. That drag against the bare surface creates tension across the skin of the dough. Tension is what forces the bun to climb upward instead of slumping outward.
Final proof for 45 to 75 minutes at 75 to 80°F. A properly proofed bun looks puffy and slightly jiggly, and a fingertip poke springs back slowly while leaving a shallow mark. Spring back too fast and it's underproofed; leave no mark at all and you've gone too far.
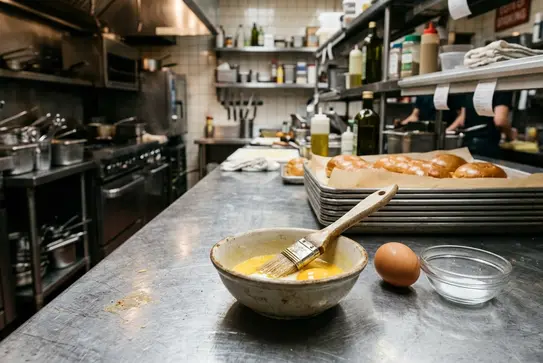
The Double Wash
This is the trick that separates bakery buns from homemade ones. Wash once after shaping, then again just before baking. Use one egg beaten with 10 to 15 grams of milk and a pinch of salt. Add sesame seeds immediately after that second coat so they anchor as the crust sets.
Bake at 375°F for 15 to 18 minutes, rotating the tray once after 10 to 12 minutes, until the crust turns deep mahogany and the center reads 190 to 195°F. That double wash is what delivers the dark, mirror-like shine you've been chasing.
The Ultimate Test
The final discipline is restraint. The bun is not finished when it leaves the oven.
Rest the buns on a wire rack for 1.5 to 2.5 hours before slicing so the starches set and the steam redistributes through the crumb. Cut too early and you learn the hard way: slicing 15 to 30 minutes out of the oven traps a gummy layer against the knife, and that heel compresses to paste under the first hot patty. Patience here is not optional.
When it's time for service, split the buns and griddle the cut sides in butter or beef fat for 60 to 90 seconds over medium heat, just until the surface lightly seals. That seal is your last line of defense against sogginess.
A successful test bun holds a 6 to 8 ounce patty with cheese and sauce for a full 8 to 12 minutes without the heel turning pasty or tearing at the edges. That's the whole point of every ratio and rest we've walked through.
So now that you've got the hydration dialed to 58 to 62%, the butter held at 18 to 22%, and the tangzhong ready to keep the crumb soft for days — which burger are you going to build to test your very first batch?






Leave a Comment